
Raise of hands - who doesn't want a set of pearly whites? Between the whitening toothpastes, rinses, strips, even charcoal powder, I've tried them all but they have been short lived (except for the charcoal - I'm still working on that.) But none of these have provided the instant gratification that I was looking for to keep me wanting more. When Smile Brilliant reached out to me, I immediately checked out the testimonials and I was intrigued so I had to give it a try.
Now you're probably wondering what makes Smile Brilliant different than the other whitening systems? Glad you asked... Smile Brilliant is an at home teeth whitening process that utilizes custom-fitted whitening trays created by dental professionals. And you never have to step foot in a dentist's office (I'll take it because who likes going to the dentist anyway!)
Since Smile Brilliant caters to each person individually, there are a few different steps that I want to quickly touch upon before sharing my personal experience!
Be sure to scroll down because there is a giveaway and code at the end!

Step 1. Make Your Dental Impressions
Hooray...your welcome kit has arrived! Included in your kit are materials to create your dental impressions along with really helpful step-by-step directions. Just mix the putty, put it in the molds and create your impressions. They include extra material in case you make a mistake!
Tip: While this step is easy, it still felt a bit scary because the putty hardens around your teeth! The trick is to mix the putty quickly and to not leave it on your teeth for too long, maybe 30-45 seconds at most.
Step 2. Mail Impressions and Wait For Lab To Create Them
Once you create the impressions, mail them back to the lab in the enclosed envelope and wait patiently for the whitening trays to arrive. It's a pretty quick turnaround; mine came in less than 2 weeks.

Step 3. Whiten Teeth
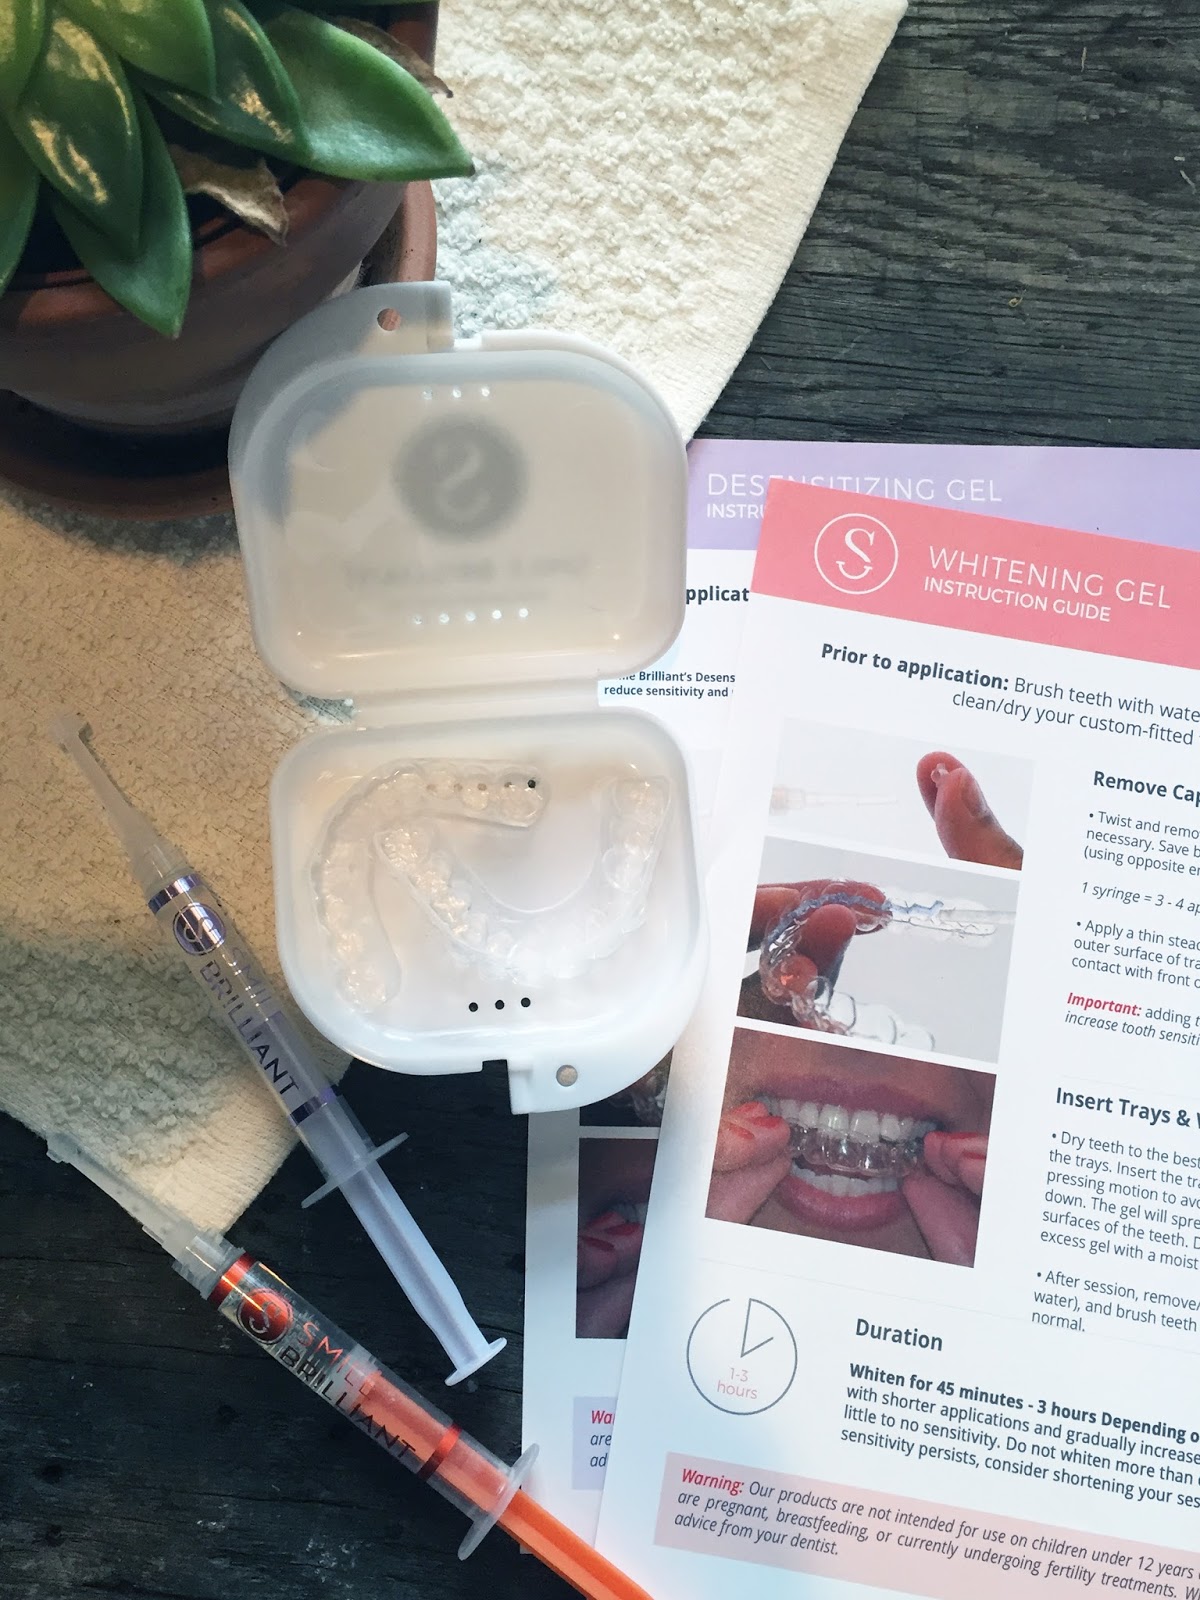
Now that the trays have arrived, it's time to whiten! To prep, just floss and brush teeth with water only. The kit comes with 4 tubes of whitening gel. Each tube is good for 3-4 uses. Just apply the desired amount of gel on the side of the tray that goes over the front of your teeth.
Once the whitening is done, brush teeth with toothpaste and rise the trays with cold water and dry and proceed to step 4!
Tip: Since you can't eat for 30 minutes after using, it's recommended to whiten teeth before bed to avoid any restaining. This is a great time to catch up on Netflix or a good book (I'm always looking for recommendations on either!!)
Step 4. Desensitize Teeth
To finish up the whitening process, just apply the desensitizing gel on the trays and leave on for 15-20 minutes immediately after whitening.
Tip: As mentioned before, I have such sensitive teeth so this step was key! Plus the desensitizing gel protects/renews teeth and helps prevent restaining!
Step 5. Repeat
And that's it - you just repeat depending on your needs. Based on how your teeth react, you can whiten from 45 minutes up to 3 hours. You can whiten daily or skip days. Not too bad.
My Experience

Guys, I had a lot of concerns before agreeing to try this. I have sensitive teeth. I hate having anything on my teeth for a long period of time (hence why the whitening strips were short lived.) I was skeptical that the results would be immediate and that I would be left with streaky teeth. But I'm so glad I gave Smile Brilliant a try...
- My teeth tend to be sensitive so I err on the side of caution and use less gel on my trays. I leave my trays on for 45 minutes - 1 hour (I personally can't have them on any longer!) I did not experience excessive sensitivity. The first time I used the trays my teeth felt a little tingly (not painful) for the next day. After that, it was just sensitive the morning after whitening but that feeling quickly faded. If you have sensitive teeth, you can definitely use this!
- Since I don't use whitening strips, it took a little getting used to having the trays in for a longer amount of time. But I was so impressed with how perfectly the molds fit my teeth. But I'm not going to lie, it was still an uncomfortable feeling.
- So about those immediate results... First a quick disclaimer; I am not a daily coffee drinker/avid red wine drinker so my staining was not that deep to begin with. That being said, I did see visible whitening the first time I used Smile Brilliant (even though it's hard to tell in the photo above.) It did look a little patchy right after using, but the streaky spots were gone after brushing my teeth and using the desensitizing gel.
Giveaway Time
Smile Brilliant kit starts at $129, but you can read up on the different options here. Even better, you can try it for yourself. Smile Brilliant has kindly offered to give away a kit to one of my readers. Just enter here.
You can also use code paintthetownchic for $20 off your trays!
Thanks for reading this super long post. I hope this was a helpful look at how Smile Brilliant works. I am happy to answer any other questions about my whitening experience. Feel free to comment, email me or find me on Instagram!

Tooth Whitening Gel
I have sensitive teeth too, girl! I have always been a little sceptical about at-home whitening but this kit looks so much more involved that your standard paint on whitening pens or whathaveyou. You can really see a difference in your results! Awesome! :)
ReplyDeleteChristie's Take on Life. xx
I've always wanted to try at home teeth whitening but the idea made me nervous! Sounds like it's totally worth it though!
ReplyDeleteSmile Brilliant is such a wonderful at home teeth whitening product. I love how easy their system is to use.
ReplyDeleteOhhh I would love to have my teeth whitening but I have heard so bad things about the products so I am afraid of trying any but Smile briliant does sound very good and harmless so I will look it up further! The giveaway is valid in Switzerland?
ReplyDeletewow you can really see the difference! Awesome! I was always sceptical because i have very sensitive teeth ( thank you mom n dad) but this one looks pretty safe! I shall give it a go!
ReplyDeleteHave never tried anything like that. Looks like a great DIY dental kit.
ReplyDeleteSounds great. In the past, I've tried similar items and they make my teeth so sensitive. Might be worth trying since it's been a few years.
ReplyDeleteI used Smilet Brilliant a year ago, and the whitening results are just as amazing on year later. I enjoyed reading your post. ThanKS for sharing. ~Joy
DeleteI used Smilet Brilliant a year ago, and the whitening results are just as amazing on year later. I enjoyed reading your post. ThanKS for sharing. ~Joy
DeleteSMile brilliant seems a promising home whitener for teeth. I think I need to share this up with my hubby who is having lots of pale teeth.
ReplyDeleteThis comment has been removed by the author.
ReplyDeleteWho wouldn't want to have whiter teeth? This is a great present, for my self, or my loved one. Thanks for the code also :-D
ReplyDeleteThis kit looks a lot like the professional one that I used to get from the dentist! I used to whiten my teeth regularly but I've gotten away from doing so. It's definitely time for me to whiten again and I will have to look into this. Thanks for sharing your code!
ReplyDeleteIt is safe though, I don't like super white teeth always looked unnatural to me
ReplyDeleteWhat a difference in the picture shown! I have very sensitive teeth as well, may be something I give serious thought too as I have been afraid to make them even more sensitive.
ReplyDeleteVery interesting. You have given me the empetus to do something about my teeth. Thank you
ReplyDeleteSo nervous when it comes to these whiten at home kits - but this looks nice and easy
ReplyDeleteI’m all about at home teeth whitening!!! The price is just right and who doesn’t want whiter teeth
ReplyDelete